A while back I posted about this same topic using CosmosDB, for handling situations when the data structure varies from file to file. This new post uses the same example data file, but this time we're using U-SQL in Azure Data Lake instead. This technique is important because reporting tools frequently need a standard, predictable structure. In a project I'm currently doing at work, conceptually what is happening is this:
In this scenario, the raw JSON files can differ in format per file, but the output is consistent per file so analytics can be performed on the data much, much easier.
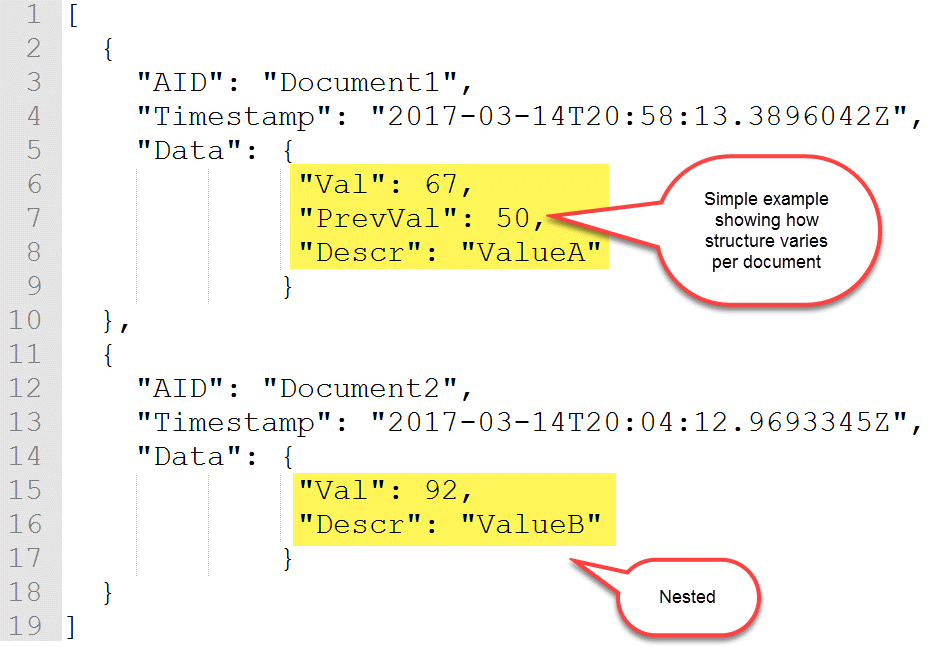
Here is a (highly simplified!) example which shows how I have a PrevVal in one JSON document, but not the other:
Prerequisites
You need to have Azure Data Lake Store and Azure Data Lake Analytics provisioned in Azure.
Summary of Steps
Handling the varying formats in U-SQL involves a few steps if it's the first time you've done this:
- Upload custom JSON assemblies [one time setup]
- Create a database [one time setup]
- Register custom JSON assemblies [one time setup]
- Upload JSON file to Azure Data Lake Store [manual step as an example--usually automated]
- Run U-SQL script to "standardize" the JSON file(s) into a consistent CSV column/row format
Step 1: Obtain Custom JSON Assemblies
Currently the JSON extractor isn't built-in to Azure Data Lake Analytics, but it is available on GitHub which we need to register ourselves in order to use. There are two assemblies we are concerned with, and they are available from: https://github.com/Azure/usql/tree/master/Examples.
To obtain the custom JSON assemblies:
- Fork the USQL repository from GitHub.
- In Visual Studio, open the Microsoft.Analytics.Samples.Formats project (under the usql-master\Examples\DataFormats folder).
- Build the project in Visual Studio.
- Locate these two DLLs in the bin folder: Microsoft.Analytics.Samples.Formats.dll -and- Newtonsoft.Json.dll which should be located in <PathYouSelected>\usql-master\Examples\DataFormats\Microsoft.Analytics.Samples.Formats\bin\Debug.
- Hang onto where these two DLLs are - we'll need them in step 3.
- Make sure these DLLs are added to your source control project, along with the rest of the U-SQL scripts mentioned in the remainder of this post.
Step 2: Create a Database in Azure Data Lake
We want a new database because we need somewhere to register the assemblies, and using Master for this purpose isn't ideal (though it will work for these two assemblies, I've found it doesn't work for another custom assembly I tried -- so I make a habit of not using Master for any user-defined objects). Also, if you end up with other related objects (like stored procedures or tables), they can also go in this database.
CREATE DATABASE IF NOT EXISTS BankingADLDB;
Mine is called 'BankingADLDB' for two reasons: My demo database is about Banking. And, being the naming convention queen that I am, I prefer having 'ADLDB' as part of the name so it's very clear what type of database this is.
You'll want to run this as a job in Azure Data Lake Analytics (or from within a Visual Studio U-SQL project if you prefer):
Note I gave the script a relevant job name so if I'm looking in the job history later, the scripts are easy to identify.
To view the database, use the Data Explorer from Azure Data Lake Analytics (rather than the Store):
Step 3: Register Custom JSON Assemblies in Azure Data Lake
Upload your two DLLs from the bin folder to your desired location in Azure Data Lake Store. You'll need to create a folder for them first. I like to use this path: \Assemblies\JSON in ADLS:
Now that the files are somewhere Azure Data Lake Analytics (ADLA) can find, we want to register the assemblies:
USE DATABASE [BankingADLDB];
CREATE ASSEMBLY [Newtonsoft.Json] FROM @"Assemblies/JSON/Newtonsoft.Json.dll";
CREATE ASSEMBLY [Microsoft.Analytics.Samples.Formats] FROM @"Assemblies/JSON/Microsoft.Analytics.Samples.Formats.dll";
Sidenote: Don't forget to specify relevant security on the new Assemblies folder so your users are able to reference the assemblies when needed.
Step 4: Upload JSON File to Azure Data Lake Store
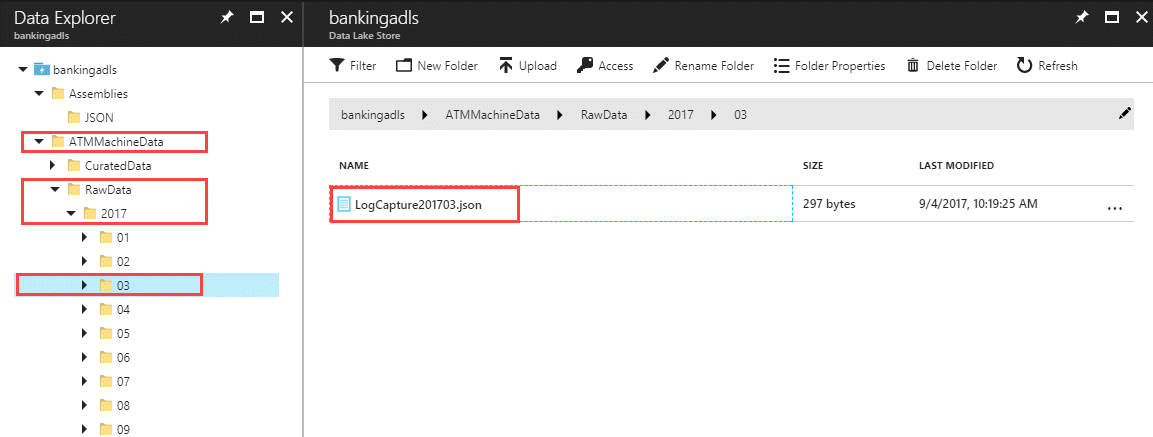
Normally this step would be done in an automated fashion. However, for this post we need to manually get the file into the Data Lake Store. To simulate a realistic scenario, I have shown partitioning of the raw data down to the month level:
Here is the text for the JSON file contents:
[
 {
 "AID":"Document1",
 "Timestamp":"2017-03-14T20:58:13.3896042Z",
 "Data": {
"Val": 67,
"PrevVal": 50,
"Descr": "ValueA"
 }
 },
 {
 "AID":"Document2",
 "Timestamp":"2017-03-14T20:04:12.9693345Z",
 "Data": {
"Val": 92,
"Descr": "ValueB"
 }
 }
]
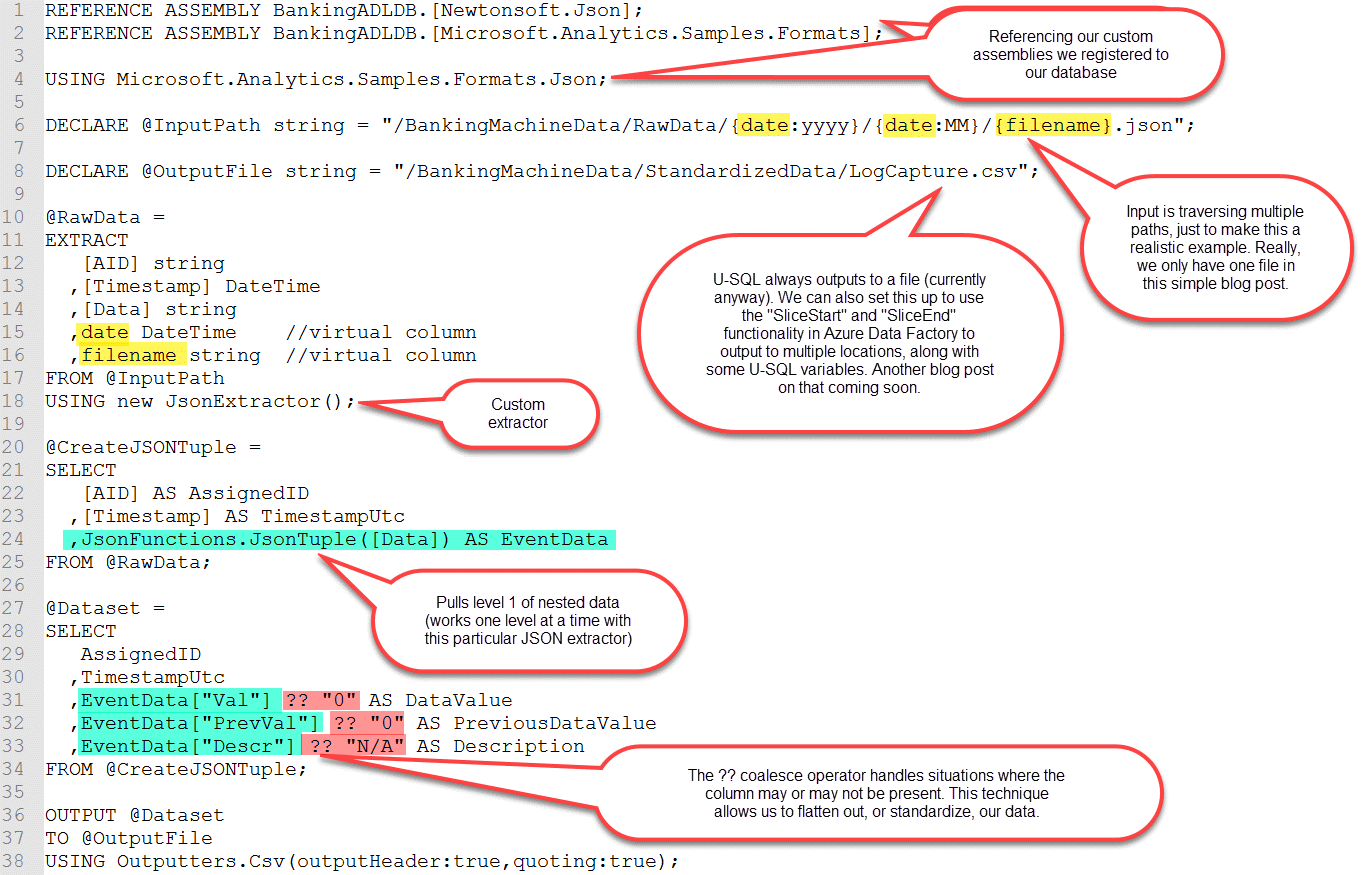
Step 5: Run U-SQL Script to Standardize JSON Data to a Consistent CSV Format
Finally! We're past the setup and arrived at the good part.
I call this "StandardizedData" in my implementation, because I'm really just taking the RawData and changing its format into standardized, consistent, columns and rows. (In my real project, I do have another folder structure for CuratedData where the data is truly enhanced in some way.)
Here's what the CSV output file looks like in the web preview - each row has a consistent number of columns which was the objective:
And, that's it. Very easy to do on an ongoing basis once the initial setup is complete. There's also a multi-level JSON extractor posted to GitHub which I haven't needed to use as of yet. If you have numerous levels of nesting, you will want to look into that extractor.
One reason this approach works well for me: if a new property should slip into the raw JSON and you don't know about it, as long as you're keeping the raw data indefinitely you can always re-generate the standardized data. In the meantime until the new property is discovered, it won't error out (this isn't always the behavior for every U-SQL extractor but it does work for this JSON extractor).
Here is the full text of the U-SQL script which is copy/paste friendly:
REFERENCE ASSEMBLY BankingADLDB.[Newtonsoft.Json];
REFERENCE ASSEMBLY BankingADLDB.[Microsoft.Analytics.Samples.Formats];

USING Microsoft.Analytics.Samples.Formats.Json;

DECLARE @InputPath string = "/ATMMachineData/RawData/{date:yyyy}/{date:MM}/{filename}.json";

DECLARE @OutputFile string = "/ATMMachineData/StandardizedData/LogCapture.csv";

@RawData =
EXTRACT
 [AID] string
,[Timestamp] DateTime
,[Data] string
,date DateTime//virtual column
,filename string//virtual column
FROM @InputPath
USING new JsonExtractor();

@CreateJSONTuple =
SELECT
 [AID] AS AssignedID
,[Timestamp] AS TimestampUtc
,JsonFunctions.JsonTuple([Data]) AS EventData
FROM @RawData;

@Dataset =
SELECT
AssignedID
,TimestampUtc
,EventData["Val"] ?? "0" AS DataValue
,EventData["PrevVal"] ?? "0" AS PreviousDataValue
,EventData["Descr"] ?? "N/A" AS Description
FROM @CreateJSONTuple;

OUTPUT @Dataset
TO @OutputFile
USING Outputters.Csv(outputHeader:true,quoting:true);
Want to Know More?
My next all-day workshop on Architecting a Data Lake is in Raleigh, NC on April 13, 2018.
You Might Also Like...
Querying Documents with Different Structures in Azure CosmosDB
Data Lake Use Cases and Planning Considerations


