Getting Started with Parameters, Variables & Configurations in SSIS 2012

Overview:  This is a high level review of the terminology for configurable items like parameters and variables in SQL Server Integration Services 2012.  This discussion is applicable to the Project Deployment Model only.

Following is a high level flowchart of how values can be passed to parameters, variables and connection managers in SSIS 2012.  The left side represents the SQL Server Data Tools environment in Visual Studio (i.e., during development before the project has been deployed); the right side represents the SSIS Catalog in the Management Studio environment (i.e., after deployment).

image

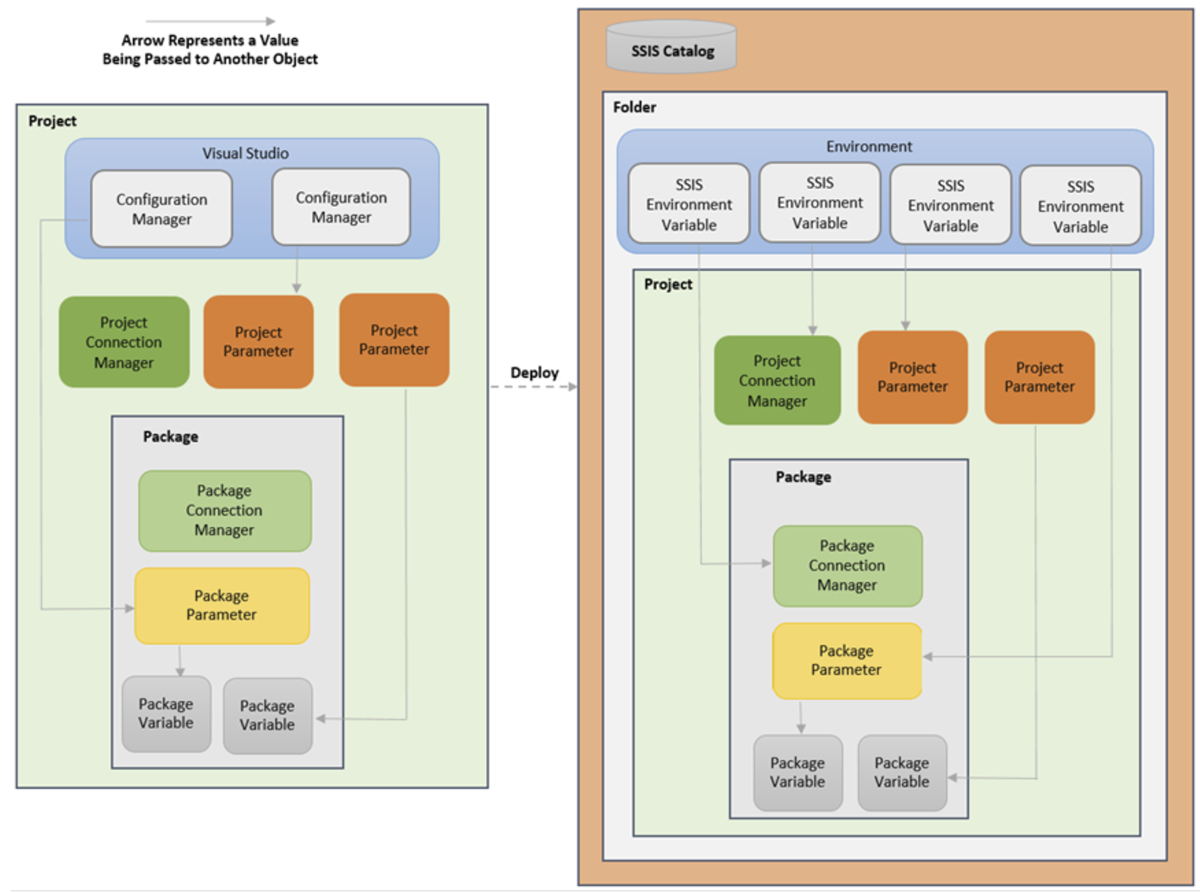
The remainder of this blog entry will discuss individual components of the above flowchart.

SSIS Project & Package Parameters

Project parameters are new with SSIS 2012.  A project parameter can be shared among all of the packages in an SSIS project.  You want to use a project parameter when, at run-time, the value is the same for all packages. 

image

Package parameters are also new with SSIS 2012.  A package parameter is exactly the same as a project parameter – except that the scope of a package parameter is the individual package it resides in.  You want to use a package parameter when, at run-time, the value is different for each package. 

SSIS Package Parameters

Note that project parameters do *not* have an expressions property to define their value.  They are intended to hold a literal value which does not change while the package executes.

See in the image at the top of the page that project parameters can pass a value to variables?  Parameters can also pass values to all kinds of objects in SSIS – basically any property that allows an expression.

You can think of parameters are the replacement for package configurations which were used in earlier versions of SSIS.

More details on defining parameters:  http://blogs.msdn.com/b/mattm/archive/2011/07/16/configuring-projects-and-packages-using-parameters.aspx

SSIS Variables

There’s actually not too much new here with *package* variables in SSIS 2012 (other than you can move them now which is great).  What can get confusing is that sometimes the environment variables are just referred to as variables – so you need to be aware of the context in which variables are being discussed.  (Environment variables are discussed in the next section below.) 

Within a package, SSIS variables have an expression property.  The expression property, and the ability to change values during the execution of a package if needed, are two fundamental differences variables have from parameters.  A variable can be scoped to the package or an object within the package (there’s no such thing as a project variable though). 

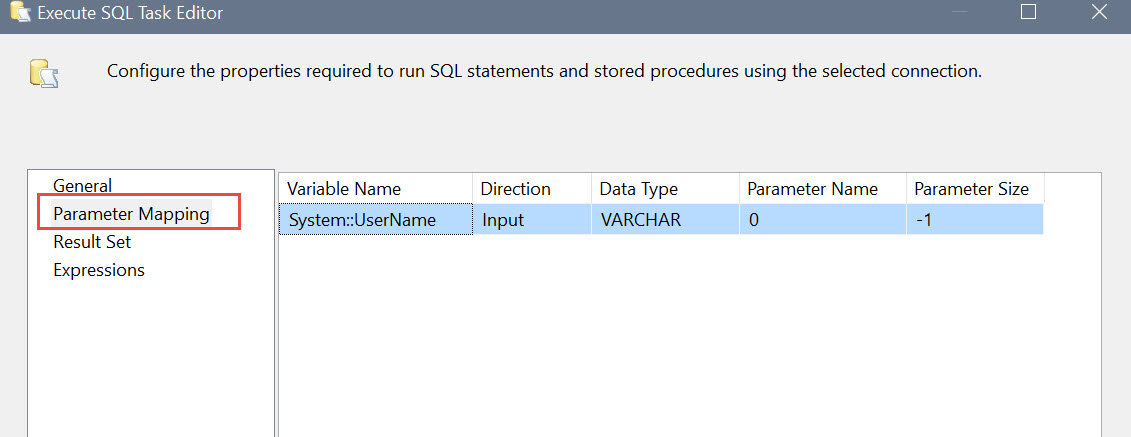
Variables often consume values from parameters within their expressions (an example of this is in the next screen shot).  Variables can also communicate values to objects like Execute SQL tasks, For Each containers, Send Mail tasks, and so on.

image

More details on SSIS variables:  http://technet.microsoft.com/en-us/library/ms141085.aspx

More details on the differences between parameters and variables:  http://www.rafael-salas.com/2011/12/ssis-2012-parameters-and-variables-what.html

More details on SSIS variables:  https://www.simple-talk.com/sql/ssis/ssis-basics-introducing-variables/

SSIS Environment Variables

SSIS environment variables are new with SSIS 2012.  You actually interact with these in Management Studio after the project has been deployed to the SSIS Catalog.  Don’t confuse these with Windows environment variables – although named the same, SSIS environment variables are different than Windows environment variables.  Also don’t confuse these with “regular” variables used within SSIS packages (which are discussed in the previous section above).

An environment variable provides the flexibility to configure values for parameters and connection managers in Management Studio which are different from what was originally specified when the package was deployed.  This is great functionality for the administrator of the SSIS and ETL processes.

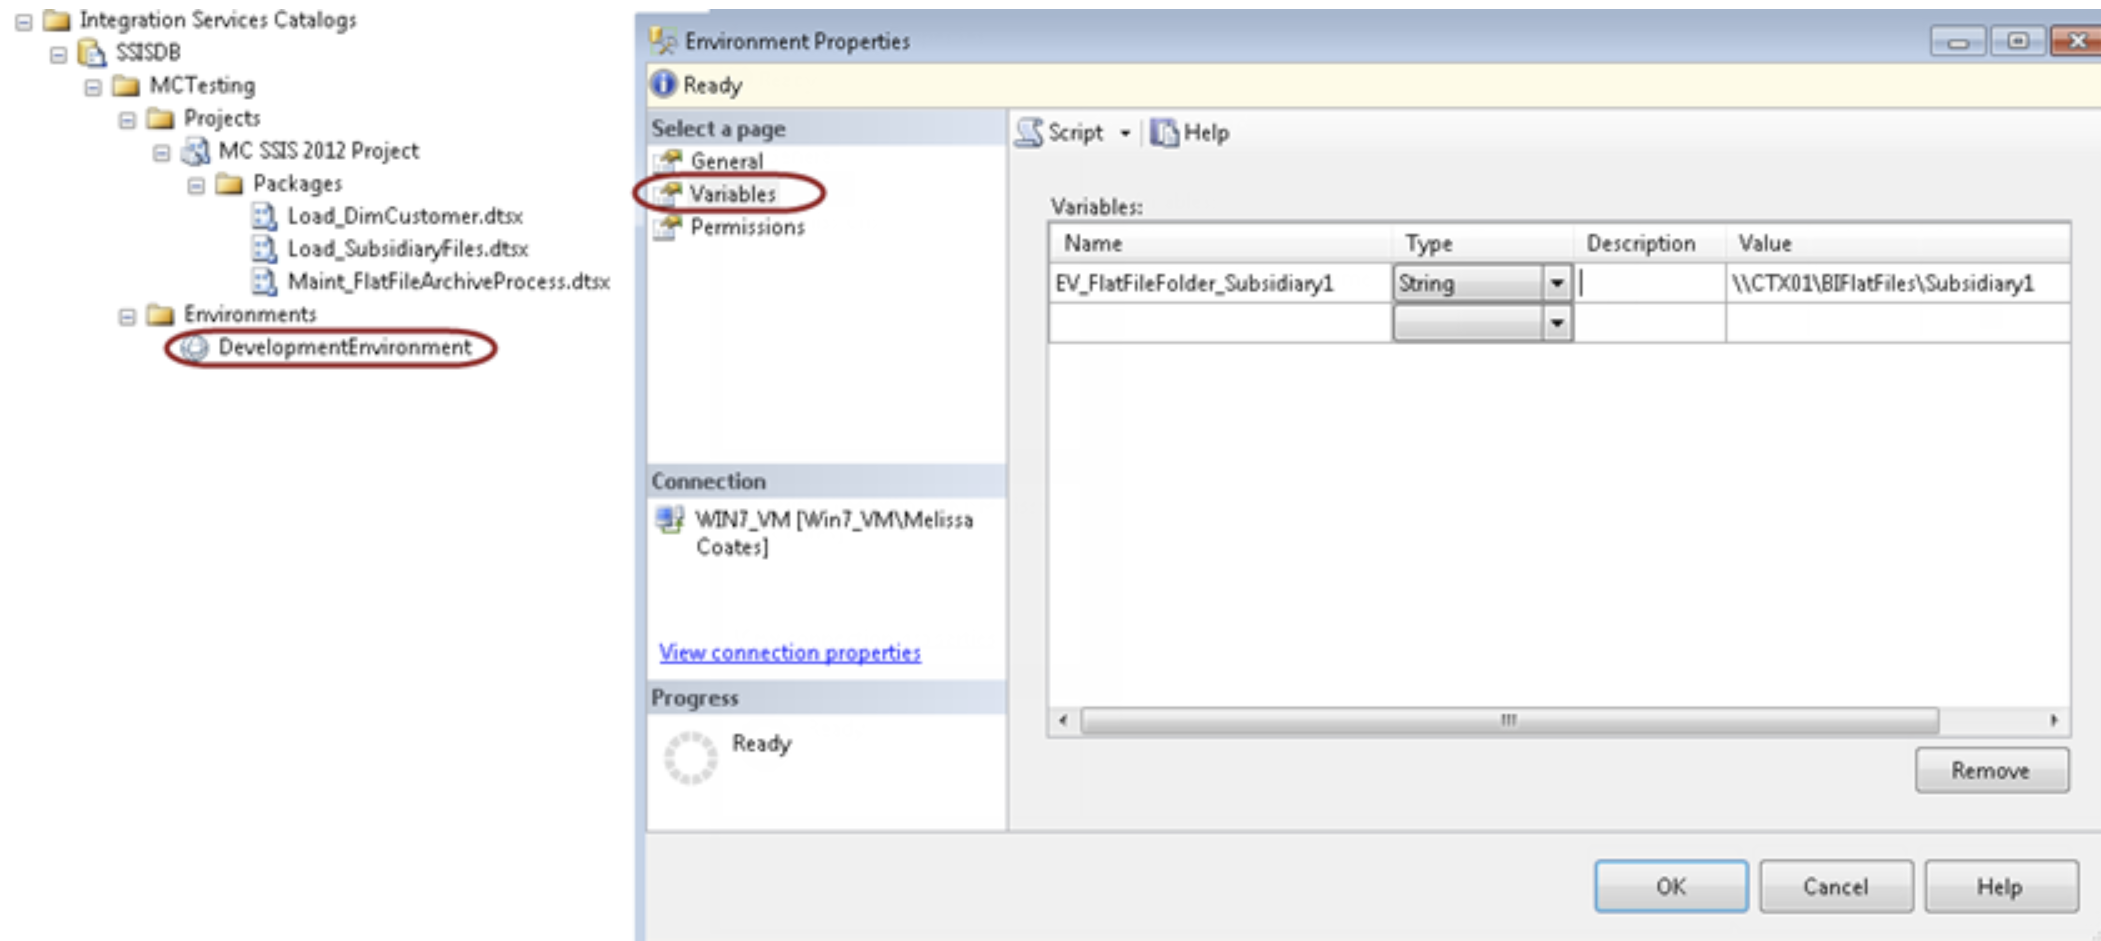
An environment(s) and its variables are set up in Management Studio under Integration Services Catalogs.  Once set up under the Environment Properties, these variables can be associated to projects and/or packages.  Since their purpose is to override parameters or connection managers, I propose a similar name to the value it’s intended to replace – but with a prefix (such as EV) that makes it clear where the value is coming from.

image

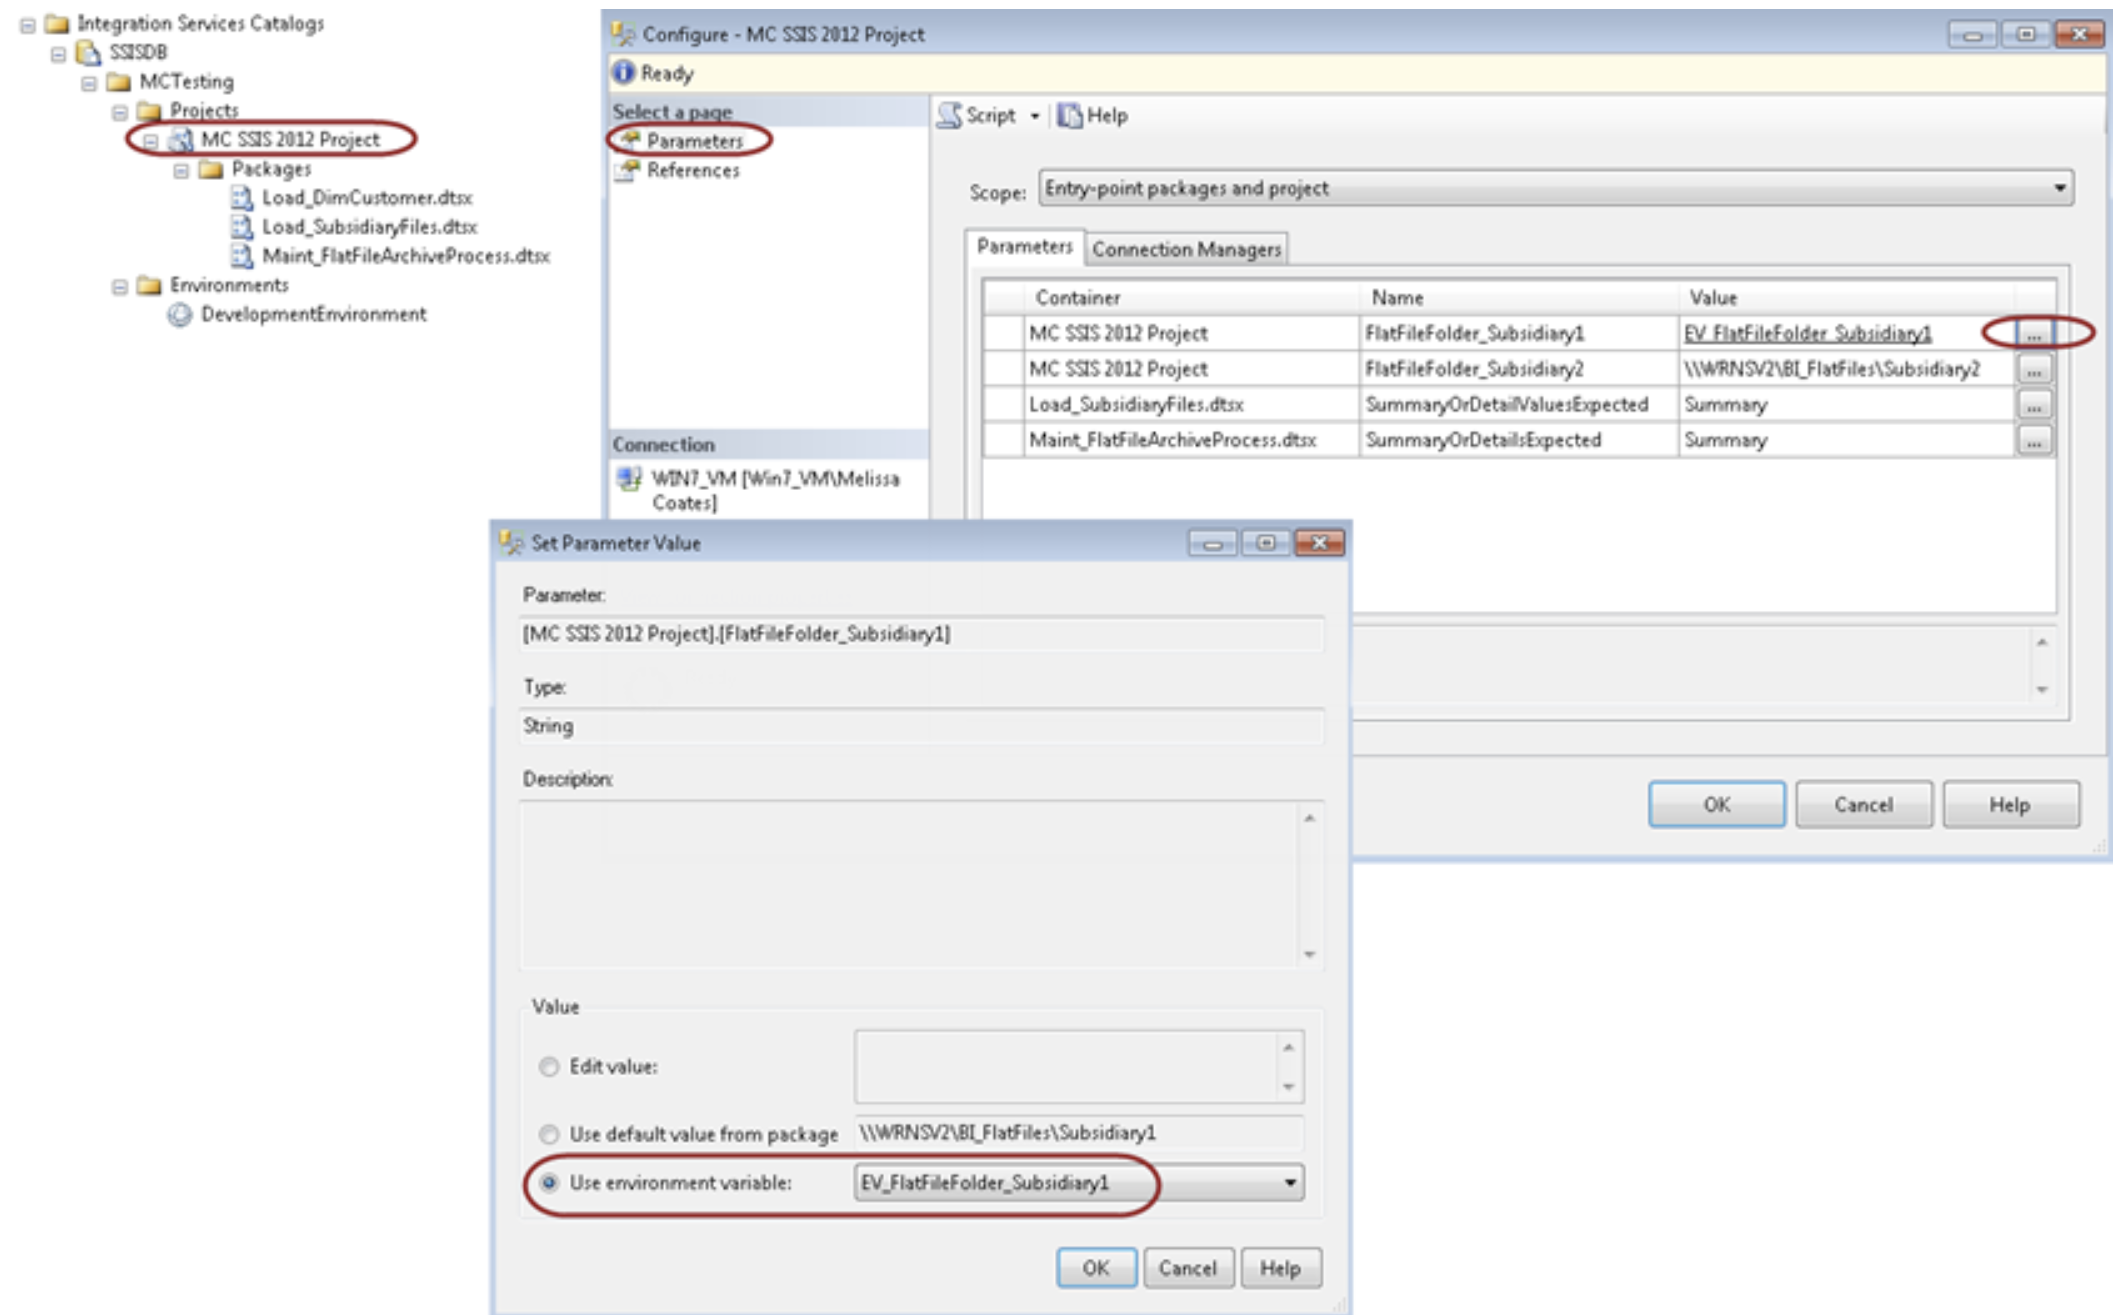
If you wish to override the value for a project parameter with an SSIS environment variable, you do this on the “Configure” menu for the project.

image

Overriding the value for a package parameter with an SSIS environment variable is very similar – it’s just done on the Package’s “Configure” menu instead.

Note that SSIS environment variables can specifically provide values for parameters and connection managers.  SSIS environment variables do not interact directly with the variables contained inside of SSIS packages.

More details on SSIS environment variables:  http://technet.microsoft.com/en-us/library/hh213214.aspx

More details on SSIS environment variables:  http://datachix.com/2011/12/02/sql-university-ssis-2012-deployments-lesson-two-part-b/

SSIS Project Configurations

With the new project deployment model, the concept of configurations is mostly gone.  There is one exception, however.  While in SQL Server Data Tools (Visual Studio), you can specify if any parameters are dependent upon a particular deployment configuration being selected.

image

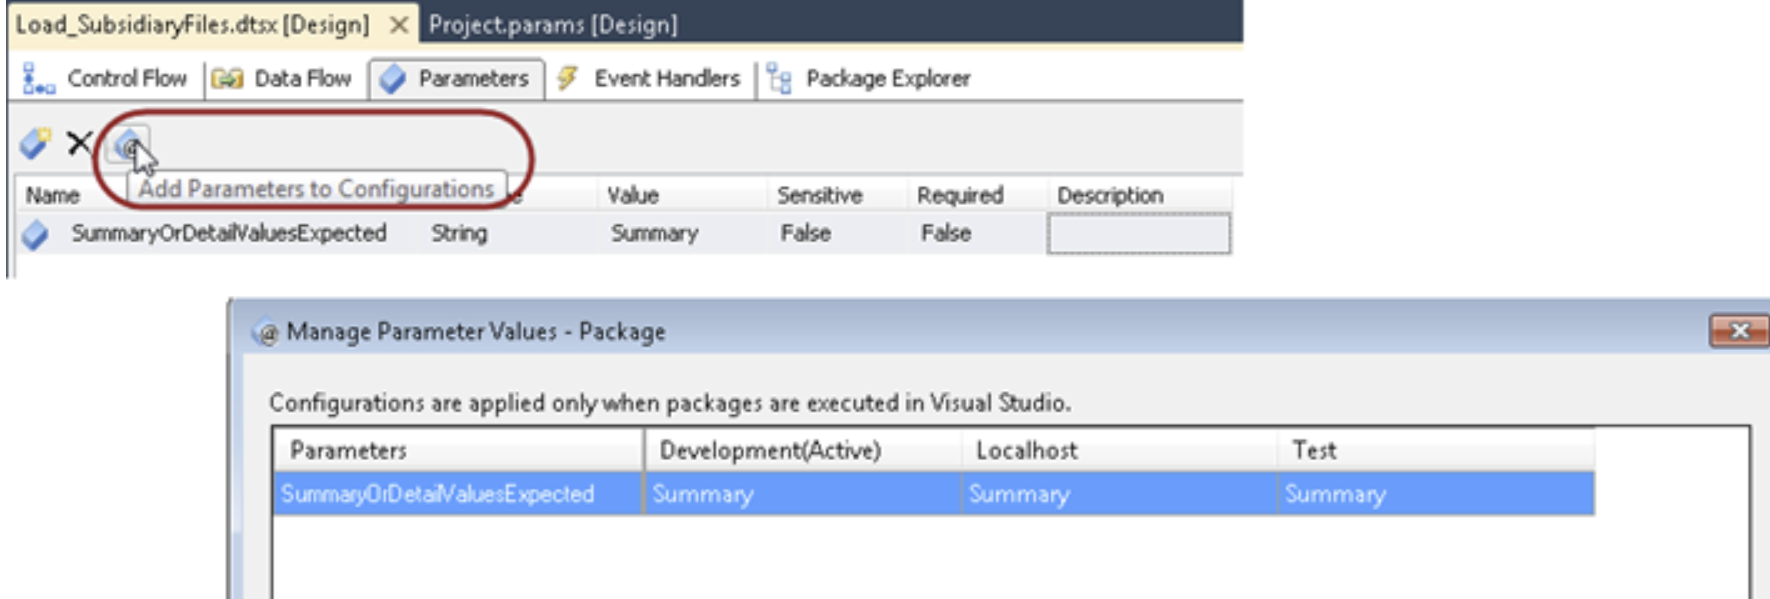
This reference to “deployment configurations” are not the configurations you might be thinking of from previous versions of SSIS – rather, these are the deployment configurations available in the project properties.  This deployment Configuration Manager has been available to manage different deployment scenarios for a long while now.  The piece that is new is the ability to associate parameters to these configurations.

image

This functionality is only available in the Visual Studio development environment, and only applies to project & package parameters.

Hope that helps clarify some of the terminology in SSIS 2012!

You Might Also Like...

Parameterizing Connections and Values at Runtime Using SSIS Environment Variables

Importing Data Into Master Data Services 2012 – Part 3

Welcome to Part 3 of a 3-part series on using the new Entity-Based Staging Process in Master Data Services (MDS) 2012.

Part 1: Overview of the Staging Process

Part 2: Loading a Model Where All Attributes Come From a Source System

Part 3: Loading a Model Where Some Attributes Are Maintained Directly in MDS

Sample Model

This builds upon the model built in Part 2 (so please review that blog entry if you’ve not done so already). 

Conceptually the Account Model looks like this:

     image_thumb[4]

The Account Entity in MDS looks like this:

     image_thumb[5]

In Part 2 we assumed that all of the attribute values come from a source system.  However, in Part 3 we are changing that up a little.  We are going to say that the Account Type is maintained directly in MDS.

When MDS is the System of Record

One of the most common use cases for MDS is to augment the data which comes from your source system(s) with additional context.  This could be groupings or descriptive information not stored elsewhere.

For purposes of Part 3, the Account Type entity is maintained in MDS only.  When an attribute is maintained directly in MDS, we need to alter the process described in Part 2 just a bit to ensure the values are preserved during the import process.

In Part 2 we said all the values come from the source.  Put another way, all data is pushed to MDS.  Conceptually, that looks like this:

     image

However, if one or more values come from MDS, we need to add a step to retrieve those values.  Otherwise, we’ll lose them.  Two reasons for this:

  1. If we use an ImportType of 2, which allows updates to occur for existing records, then a null value in the staging table will overwrite an existing value.
  2. The stored procedures provided to populate an MDS Model are not parameterized to allow us to specify which attribute(s) are loaded.  Since all attributes are part of the import process, we need to make sure all data is present in staging to preserve the existing values.

Think of it this way:  We need to retrieve the values out of MDS – as if it were any other source system – to load staging before the stored procedure executes.  Conceptually, that looks like this:

     image

SSIS Package

We’re going to use the same SSIS Package from Part 2.  (Below only shows the modifications to it, so please refer back to Part 2 for any details not listed here.)

Note the same 5 steps are present.  Loading the Account Type Entity is not present in the SSIS package, because it’s maintained directly in MDS.

     image

image

Step 2 is where the important change occurs.  Within the data flow for the Account entity, we need to query MDS to pull back the existing values for Account Type.  If we skip this step and leave it null in staging, those null values will indeed overwrite the existing values because we’re using an ImportType of 2. 

How you retrieve the data out of MDS depends on your personal preference.  In this example I used the Lookup data flow transformation in SSIS.  I don’t want to do a cross-database join in my source query, so I matched up the data from MDS after the source data is in my SSIS pipeline.

     SNAGHTML14529a07

Prerequisite for this step:  A subscription view must exist for the entity to export the data out of MDS.  A subscription view is what’s used to extract data out of MDS.  Another reminder we’re not to interact directly with the MDS source tables.  In my situation, I want a subscription view for the main Account entity – this is where the accounts are actually mapped to the values.  The Account Type entity is just a distinct list of lookup values, and doesn’t give me the mappings to actual accounts.

And that’s it!  Once you know to identify the source of all MDS attributes before you begin creation of a staging package, then it’s smooth sailing from there on.

Finding More Information

Part 1 of this series (Overview of the Staging Process)

Part 2 of this series (discusses Loading a Model Where All Attributes Come From a Source System)

MSDN – Importing Data (Master Data Services)

MSDN – Exporting Data (Master Data Services)


Importing Data Into Master Data Services 2012 – Part 2

Welcome to Part 2 of a 3-part series on using the new Entity-Based Staging Process in Master Data Services (MDS) 2012.

Part 1:  Overview of the Staging Process

Part 2:  Loading a Model Where All Attributes Come From a Source System

Part 3:  Loading a Model Where Some Attributes Are Maintained Directly in MDS

Sample Model

First, a few quick words about the sample model we’re going to use.  It’s a simple Account Model which has 3 entities.  The Account Type and Account Class entities exist solely to populate the primary Account entity.

Conceptually the Account Model looks like this:

image
image

The Account Entity in MDS looks like this:

image
image

The remainder of this blog entry discusses loading the Account model at the leaf (most detailed) level.  All attributes, for all entities, come from a source system.

Leaf Member Staging Tables

To support the Account model, 3 staging tables were created by MDS when the entities and attributes were set up:

image
image

Recall that the Account Class and Account Type are domain-based attributes, used as follows:

  • Account Type:  Contains a distinct list of Account Type code and name – used as the lookup table for the main Account entity.
  • Account Class:  Contains a distinct list of Account Class code and name – used as the lookup table for the main Account entity.
  • Account:  Contains the accounts, plus the mapped values of Account Type and Account Class. 

For purposes of this example, we are going to assume all of the attributes in these entities come from a source system external to MDS.  (Note:  Part 3 of this series looks at how to handle it if one or more attributes are maintained directly in MDS – i.e., the data doesn’t exist in a source system anywhere.)

SSIS Package

Following is an example of the flow for the SQL Server Integration Services (SSIS) package.  Note that in a Production ETL environment a few things will be more dynamic, but the purpose of this example is to be simple & straightforward.

image
image
image
image

Step 1:  Truncates each of the 3 staging tables.  This is to eliminate the data from the last time this process ran.

image
image
image
image

Step 2:  Data flow to populate each entity in the model.

image
image

In your source query, make sure you pull back the code field for the domain-based attributes rather than the name field.  For the Account entity, we’ll only populate Account Type and Account Class fields with the code value.  However, if we were populating the Account Class or Account Type entity, we would populate both code and name.

The derived columns include:

  • ImportType of 2 (which means updates can be accepted vs. a failure).  There are 6 codes to choose from to control the behavior.  The list of ImportType codes can be found here:  http://msdn.microsoft.com/en-us/library/ee633854.aspx
  • ImportStatus_id of 0 (which means each record is ready).
  • BatchTag which I chose to create from an ETLExecution_id (i.e., a unique code used for ETL job management) plus a string which refers to this entity.  The reason the string is appended is so that each BatchTag is unique for every data flow.  MDS will generate an error if > 1 of the same BatchTag executes at the same time.  Therefore, each of the 3 data flows in my example append a different string so they are allowed to run in parallel for speed.
image
image

The data conversions are only needed because my source data was non-Unicode, and MDS is Unicode.

image
image

Mapping of fields into the Leaf Member Staging Table looks like this:

image
image

The Code can be ignored if you specified for the Code to be created automatically when the entity was set up (a new feature in MDS 2012).

More information about populating the Leaf Member Staging Table can be found here:  http://msdn.microsoft.com/en-us/library/ee633854.aspx

image
image

Step 3:  Load the MDS Model.  With this step, we’re going to be invoking the MDS-provided stored procedure that takes the data out of staging and moves it into the actual model. 

Each staging table has its own stored procedure.  The stored procedure name will be in the format of udp_EntityName_Leaf (unless a different name was chosen when the entity was created). 

image
image

Syntax is as follows:

DECLARE @RC int

DECLARE @VersionName nvarchar(50)

DECLARE @LogFlag int

DECLARE @BatchTag nvarchar(50)

SET @VersionName = N'VERSION_1'

SET @LogFlag = 1

SET @BatchTag = (? + ' Account')

EXECUTE @RC = [stg].[udp_Account_Leaf]

   @VersionName

  ,@LogFlag

  ,@BatchTag

GO

Note that the BatchTag needs to match what was specified in the Step 2 data flow.  I’ve set mine to be unique per entity so the batches can be executed in parallel.  The ? in the screen shot above signifies I’m using a parameter (which is mapped to a variable which contains the ETLExecution_id); this helps the BI team managing nightly loads know which run this was associated to.

A LogFlag of 1 specifies logging is enabled.  The VersionName also needs to be specified – a slight complication if you do a lot of versioning in your environment.

Execution of this step to load the model is what correlates to the Integration Management page in MDS:

image
image

More information about loading the MDS Model can be found here: http://msdn.microsoft.com/en-us/library/hh231028.aspx

image
image

Step 4:  Validation of the Model.  Until validation is performed, the new inserts and updates are there but in a “waiting validation” status.  If any Business Rules have been defined for the model, they will be applied when Validation is run.

The Validation applies to the model as a whole, so it only needs to be done once regardless of how many entities we just loaded.

image
image

Syntax is as follows:

DECLARE @ModelName nVarchar(50) = 'Account Model'

DECLARE @Model_id int

DECLARE @UserName nvarchar(50)=?

DECLARE @User_ID int

DECLARE @Version_ID int

SET @User_ID =  (SELECT ID 

                 FROMmdm.tblUser u

                 WHERE u.UserName = @UserName)

SET @Model_ID = (SELECT Model_ID

                 FROM mdm.viw_SYSTEM_SCHEMA_VERSION

                 WHERE Model_Name = @ModelName)

SET @Version_ID = (SELECT MAX(ID)

                   FROM mdm.viw_SYSTEM_SCHEMA_VERSION

                   WHERE Model_ID = @Model_ID)

EXECUTE mdm.udpValidateModel @User_ID, @Model_ID, @Version_ID, 1

More information about validating the Model can be found here:  http://msdn.microsoft.com/en-us/library/hh231023.aspx

The @UserName variable in the above validation statement is mapped to a parameter which references the UserName of the system variable. As long as all persons or service accounts have access to the model, that should work.

 
image
image
image
image

The 5th and final step I have in my package is to check if any errors occurred and then alert the BI Team and/or Data Steward if needed.  This is done by querying the views provided by MDS for each entity. 

In my process, I just do a simple query that checks if 1 or more error records exist and if so, send an email.  Note the ResultSet is set to Single row.  The total count is passed to a variable.  If the value of the variable is >=1, the next step of generating an email will be kicked off.

image
image

The syntax is as follows:

;WITH CTE_CheckEachTable AS

(

SELECT Count_MDSErrors = COUNT(*)

FROM stg.viw_Account_MemberErrorDetails

UNION ALL

SELECT Count_MDSErrors = COUNT(*)

FROM stg.viw_Account_Class_MemberErrorDetails

UNION ALL

SELECT Count_MDSErrors = COUNT(*)

FROM stg.viw_Account_Type_MemberErrorDetails

)

SELECT Count_MDSErrors = SUM(Count_MDSErrors)

FROM CTE_CheckEachTable

More information on viewing errors can be found here:  http://msdn.microsoft.com/en-us/library/ff486990.aspx

Out Of Scope

The above process excludes the following:

  • Changing the code for an existing record (i.e., usage of the New Code field in the staging table).
  • Deactivating or deleting an existing record (i.e., via usage of specific ImportType codes).

Finding More Information

Part 1 of this series (Overview of the Staging Process)

Part 3 of this series (discusses Loading a Model Where Some Attributes Are Maintained Directly in MDS)

Importing Data Into Master Data Services 2012 – Part 1

Welcome to Part 1 of a 3-part series on using the new Entity-Based Staging Process in Master Data Services (MDS) 2012.

Part 1:  Overview of the Staging Process

Part 2:  Loading a Model Where All Attributes Come From a Source System

Part 3:  Loading a Model Where Some Attributes Are Maintained Directly in MDS

Introduction to the MDS Entity-Based Staging Structure

One of the new features of MDS in SQL Server 2012 is a new process for staging data to be imported into MDS.  Key things to be aware of:

  • Each entity has its own staging table in the stg schema.
  • Each entity has its own stored procedure (udp) to load data from staging into the model.
  • Within the stored procedure, you have an ImportType parameter which specifies how new and updated members are treated.  New in 2012 is the ability to update existing values, if you so choose. 
  • If more than one batch will be running at the same time, each batch needs a unique BatchTag. 
  • The model needs to be validated after the stored procedure to load the model is executed.
  • Each entity has its own view to display errors which occurred while loading the model.

The objective of this process is for us to interact with the staging table (in the stg schema), then allow the MDS-generated stored procedure interact directly with the model (in the mdm schema).

An overview of the process is as follows:

image
image

Advantages of this new structure include:

  • Ability to handle updates (as well as inserts and deletes), if you choose the Import Type which permits updates.
  • Easier to understand ETL processing.
  • Much faster and efficient ETL processing.
  • Security may be set up per individual staging table, if necessary.  Permission to insert data to the staging table(s) is required.
  • Security may be set up per stored procedure, if necessary.  Permission to execute the stored procedure(s) is required.
  • Members and attributes may be loaded in single batches related to one specific entity.

Tables, Stored Procedures, and Views in the Staging Schema

For each entity, up to 3 staging tables may exist depending if consolidated members exist, and if explicit hierarchies exist.  The leaf member table will always exist once the entity has been created.  It would be very common to not use all 3 possibilities.

Note:  All names are based on the Entity name unless a different name was chosen when the entity was created.

Leaf Members

     Staging table:  stg.EntityName_Leaf

Stored procedure to load model:  stg.udp_EntityName_Leaf

     View which displays errors: stg.viw_EntityName_MemberErrorDetails

     Details re: fields loaded to the staging table:  http://msdn.microsoft.com/en-us/library/ee633854.aspx

Consolidated Members

     Staging table:  stg.EntityName_Consolidated

Stored procedure to load model: stg.udp_EntityName_Consolidated

     View which displays errors: stg.viw_EntityName_MemberErrorDetails

     Details re: fields loaded to the staging table:  http://msdn.microsoft.com/en-us/library/ee633772.aspx

Explicit Hierarchies

     Staging table name: stg.HierarchyName_Relationship

     Stored procedure to modify hierarchy:  stg.udp_HierarchyName_Relationship

     View which displays errors: stg.viw_HierarchyName_RelationshipErrorDetails

     Details re: fields loaded to the staging table:  http://msdn.microsoft.com/en-us/library/ee633902.aspx

Managing Import Processes

In the Integration Management section of the MDS web interface, staging batches which have completed, or are queued to run are displayed:

image
image