
If you plan to promote a SQL Server MDS (Master Data Services) model from Dev and/or QA to Production, there's a few particulars you need to know to get it right. In this entry I'm focusing on using the "MDSModelDeploy" utility since it offers the most flexibility. Below I will discuss a two-tier MDS environment, Development and Production, just to keep things simple.
Three Options for MDSModelDeploy
DeployClone: Appropriate for the first time you promote to a new environment, such as from Dev to Prod. You can use DeployClone to deploy structure only, or structure + data. Keeps the unique identifier (MUID) consistent between environments, which is necessary if you want to keep models in sync between Dev and Prod.
DeployUpdate: Appropriate for when you want to push an update to a new environment, such as a new column in an entity. This can deploy structure changes only (ex: a new column), or structure + data (ex: refreshing Dev from Prod occasionally). Will only work when the unique identifier (MUID) is the same between source and destination.
DeployNew: Not used that frequently; only appropriate for creating a brand new model using another model as a starting point. Creates a new unique identifier (MUID) for the new model. This is *not* the choice you want to use for promoting to Production from Dev.
Checking the Service Name
Before you do any deployments, you need to know the Service Name(s), especially if you have more than one MDS instance running on the same server. In most cases this is MDS1 if you only have one MDS web app & one MDS database running on the SQL Server instance.
MDSModelDeploy listservices
In my local environment, I use several MDS databases for testing. From "listservices" we see that my MDS_Development is referred to as MDS3, and MDS_Production is MDS4.

Basic Steps for Using MDSModelDeploy
These steps will be standard for each of the examples in each section below. If MDS is installed locally (i.e., if the MDSModelDeploy utility exists on your local development box), you can omit some of the RDP steps. Also, if any shares to the MDS Configuration paths exist, you can simplify and omit RDP steps that way too. I went ahead and listed the most basic way to get it done, knowing you can simplify once you're familiar with where things are located.
1. Remote Desktop into source server where MDS is installed (ex: Dev).
2. Open an elevated command prompt (CMD > Run as Administrator).
3. In the command prompt, change the directory to the path where the MDSModelDeploy utility resides.
CD C:\Program Files\Microsoft SQL Server\120\Master Data Services\Configuration
4. Run MDSModelDeploy to generate a package from the source MDS server. Locate the deployment package on a file share (this saves you from copying and pasting it from one server's configuration folder to the other). See examples below for generating a package.
5. Remote Desktop into target server where MDS is installed (ex: Prod).
6. Open an elevated command prompt (CMD > Run as Administrator).
7. In the command prompt, change the directory to the path where the MDSModelDeploy utility resides.
CD C:\Program Files\Microsoft SQL Server\120\Master Data Services\Configuration
8. Run MDSModelDeploy to deploy the package on the destination MDS server. This will point to the share used in step 4. See examples below for deploying a package.
9. Run validation for the model just deployed.
DECLARE @ModelName NVARCHAR(50) = 'ModelName'
DECLARE @Model_Id INT
DECLARE @UserName NVARCHAR(50) = 'Domain\User'
DECLARE @User_Id INT
DECLARE @Version_ID INT

SET @User_Id = (SELECT ID FROM mdm.tbluser u WHERE u.UserName = @UserName)
SET @Model_Id = (SELECT TOP 1 model_id FROM mdm.viw_system_schema_version WHERE Model_Name = @modelname)
SET @Version_ID = (SELECT MAX(ID) FROM mdm.viw_system_schema_version WHERE Model_ID = @Model_Id)

EXEC mdm.udpValidateModel @user_id, @Model_ID, @Version_ID, 1
10. Reinstate security for users (if a clone was performed) in the Users and Group Permissions area.
11. Double check all subscription view names are correct in the Integration Management area. I've seen the subscription views come through after a DeployClone, but with new prefixes with the model name in front which needs the prefix removed so that ETL processes can continue to use the subscription views.
Example: Initial Deployment of MDS Model
This technique uses DeployClone to ensure that Dev and Prod can be kept in sync with the same unique identifier (MUID) for the model.
Source MDS server (structure only):
MDSModelDeploy createpackage -model ModelName -service MDS1 -package "X:\Path\FileName"
Source MDS server (including data):
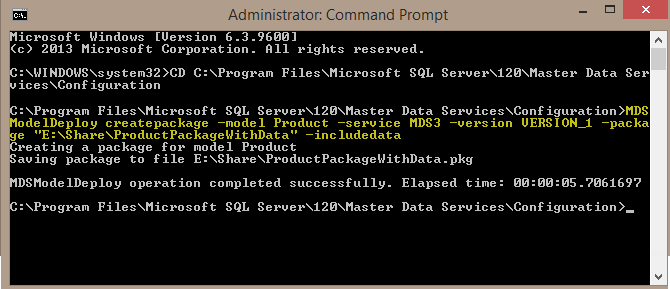
MDSModelDeploy createpackage -model ModelName -service MDS1 -version VERSION_1 -package "X:\Path\FileName" -includedata
Target MDS server:
MDSModelDeploy deployclone -service MDS1 -package "X:\Path\FileName.pkg"

Following the DeployClone, you'll also need to validate the model. Run the validation script from SSMS (see script in step 9 above).
You also need to reinstate permissions for users to see the model. This is done from the User and Group Permissions area in Master Data Manager.
I've noticed sometimes it takes a couple of minutes for everything to show up in the Master Data Manager web interface after the deployment.
Note that after this initial DeployClone, you will always do a DeployUpdate from this point forward. If you try to do another DeployClone you'll get an error that says "A clone of the model cannot be created. There is already a model with the same name or MUID." So in this case, do a DeployUpdate instead.
Example: Deploying MDS Model Changes
This technique uses DeployUpdate which requires the same unique identifier (MUID) for each model. This is often used for promoting a structural model change from Dev to Prod some time after an initial DeployClone was done. Or, the "includedata" option can be used for refreshing Dev from Prod occasionally (i.e., assuming data stewards have been keeping the data in Prod up to date).
Source MDS server (structure only):
MDSModelDeploy createpackage -model ModelName -service MDS1 -package "X:\Path\FileName"
Source MDS server (including data):
MDSModelDeploy createpackage -model ModelName -service MDS1 -version VERSION_1 -package "X:\Path\FileName" -includedata

Target MDS server:
MDSModelDeploy deployupdate -service MDS1 -package "X:\Path\FileName.pkg"

Following the DeployUpdate, you'll also need to validate the model. Run the validation script from SSMS (see script in step 9 above).
Note that if you did a DeployNew initially, then try to do a DeployUpdate, you'll get an error "The model cannot be updated. There is no match for a model with the same name and MUID." If this happens, you'll need to do a DeployClone from the best environment, delete the model from the other environments, deploy the clone, the re-implement any changes and retry the DeployUpdate.
Why It's Important to Validate After MDS Deployment
After deployment with data, the members in the model are deployed but not yet validated. This can be seen in the Master Data Manager web interface:

After you run a validation on the model, then the members will show validated in the interface:

Validation like this should also occur after any staging ETL processes are run. Here's the script to run the MDS stored procedure to validate a model. Note that the two variables at the top need a value input.
DECLARE @ModelName NVARCHAR(50) = 'Product'
DECLARE @Model_Id INT
DECLARE @UserName NVARCHAR(50) = 'COATES_HPENVY\Melissa'
DECLARE @User_Id INT
DECLARE @Version_ID INT

SET @User_Id = (SELECT ID FROM mdm.tbluser u WHERE u.UserName = @UserName)
SET @Model_Id = (SELECT TOP 1 model_id FROM mdm.viw_system_schema_version WHERE Model_Name = @modelname)
SET @Version_ID = (SELECT MAX(ID) FROM mdm.viw_system_schema_version WHERE Model_ID = @Model_Id)

EXEC mdm.udpValidateModel @user_id, @Model_ID, @Version_ID, 1
Deploying Only a Subset of a Model
The MDSModelDeploy utility deploys an entire model. What if you really only want to push one entity and be extra cautious not to touch anything else? That's where the MDSPackageEditor.exe comes in handy.

You launch the MDSPackageEditor after you have created a package from the source MDS server. Then you de-select the individual elements you want to exclude, and it saves the package as a different file name. Then you'd continue on with the deployment to the destination server like normal. Using the MDSPackageEditor.exe is much easier than editing the .pkg XML file manually.

Logging MDS Deployments
By default, trace file logging of MDS deployments is not enabled. Instructions for how to enable it can be found here: Enabling Logging to Troubleshoot MDSModelDeploy.exe. (Don't forget to back up the original config file before editing it, just to be safe.)
Note that in SQL Server 2014, Cumulative Update 6 is required in order to use the trace file. Prior to CU6, a trace file doesn't get generated even if it's been enabled in the config file. This is documented here: No MDSTrace.log file is generated after you enable tracing in the MDS 2014 web.config file. Installing CU6 did indeed solve the problem for me.
Brief example of enabling logging in the MDSModelDeploy.exe.config file:

Where to locate the MDSModelDeployTrace.log file:
